Writing a Rust Roguelike for the Desktop and the Web
gamedev, programming, tutorial, rust
|
Warning
|
This post contains the original version of the tutorial and will not be updated. Please visit the quicksilver-roguelike repository for the latest version. |
I want to participate in this year’s 7 Day Roguelike Challenge. If you’ve looked around this blog, you know the language is going to be Rust. But for the 7DRL, I’d really love if people could play it in the browser.
For a game jam, you want to as easy as possible for people to play your game. There’s so many to choose from, it’s crucial to remove any obstacles your perspective players can run into. A playable link is pretty much as close as you can get.
What follows is a little guide to get you to a small playable proof of concept that can build native Windows, macOS and Linux executables but also runs in the browser via WebAssembly.
You can check the full code (some 300 lines) here:
https://github.com/tomassedovic/quicksilver-roguelike
or read on and follow this guide.
May a thousand roguelikes bloom!
Motivation
Rust is a pretty good language for writing roguelikes: it is fast, modern (modules, closures, good collections in the standard library, powerful macros, great enums) and it can build standalone executables for all the major platforms as well the web!
The last bit is especially cool for game jams – you don’t have to worry about software packaging and distribution. Just give people a URL and they can play your game.
We’re going to build a skeleton for a traditional ASCII roguelike. You can take it and turn it into a real game. The same codebase will work for all three the major platforms as well as the web. And it will support multiple fonts and text sizes so you can have your square maps and readable text at the same time!
It will look like this:

Setup
Rust
You will need the 2018 edition of Rust to get started. Get it from the Rust website:
https://www.rust-lang.org/learn/get-started
You’ll want
rustup(it should be the default) – we’ll need it for the WebAssembly backend.
WebAssembly
WebAssembly is a new bytecode format supported in all modern desktop browsers. It’s faster than JavaScript and various languages (including Rust) can be compiled into it.
The WebAssembly compilation target is not shipped by default, but you can add it like so:
$ rustup target add wasm32-unknown-unknownYou don’t need this if you only care about the desktop.
cargo-web
cargo-web handles everything you need to ship your game on the web. Install it like so:
$ cargo install cargo-webYou don’t need this if you only care about the desktop.
Repository
Create a new project like so:
$ cargo new --vcs git roguelikeThis will initialise a new git repository as well! Remove
--vcs gitif you don’t want that.
If you’ve got everything set up properly, you should be able to run the default program:
$ cd roguelike
$ cargo run --release
It will print:
$ cargo run --release
   Compiling roguelike v0.1.0 (/home/thomas/tmp/roguelike)
    Finished release [optimized] target(s) in 0.92s
     Running `target/release/roguelike`
Hello, world!
Quicksilver
Rust has several gamedev engines and frameworks. We are going to use Quicksilver because it lets you target both the desktop and web really easily!
Open your Cargo.toml in the root of your repository and add this at the end:
[dependencies]
# More features: "collisions", "complex_shapes", "immi_ui", "sounds", gamepads
quicksilver = { version = "0.3.6", default-features = false, features = ["fonts", "saving"]}
We’re disabling most of the features. You don’t have to do this, but some of these require libraries you might not have installed. The above should compile pretty much anywhere.
You can always add the sound or gamepad support later if you need it.
Run the program again to build the quicksilver dependency:
$ cargo run --releaseThis might take a couple of minutes. It should print out the same hello world message as before.
We’ll be always building the optimised version in this guide. You can drop the
--releaseflag but if you do, you’re not allowed to make any speed measurements. Rust’s debug builds are slower than you think. They’re slower than unoptimised C++. They’re slower than Ruby.
Hello, Game!
The first thing we’ll do is create a window and print some text on it. We’ll do all our coding in the src/main.rs file in the game repository. It’s less than 300 lines total.
Empty Window
A Quicksilver app is all encapsulated in an item that implements the quicksilver::lifecycle::State trait:
struct Game;

impl State for Game {
    /// Load the assets and initialise the game
    fn new() -> Result<Self> {
        Ok(Self)
    }

    /// Process keyboard and mouse, update the game state
    fn update(&mut self, window: &mut Window) -> Result<()> {
        Ok(())
    }

    /// Draw stuff on the screen
    fn draw(&mut self, window: &mut Window) -> Result<()> {
        Ok(())
    }
}
Our game code will go into the three methods above.
To run the game add the above to main.rs and replace the main function with:
fn main() {
    let settings = Settings {
        ..Default::default()
    };
    run::<Game>("Quicksilver Roguelike", Vector::new(800, 600), settings);
}
The Settings struct lets us control various engine settings that we’ll get to later. The 800 and 600 numbers represent the logical size of your window. Depending on your DPI settings, it might be bigger than that.
And finally, we need to bring all the items we use into scope. Put this at the top of your file:
use quicksilver::{
geom::Vector,
lifecycle::{run, Settings, State, Window},
Result,
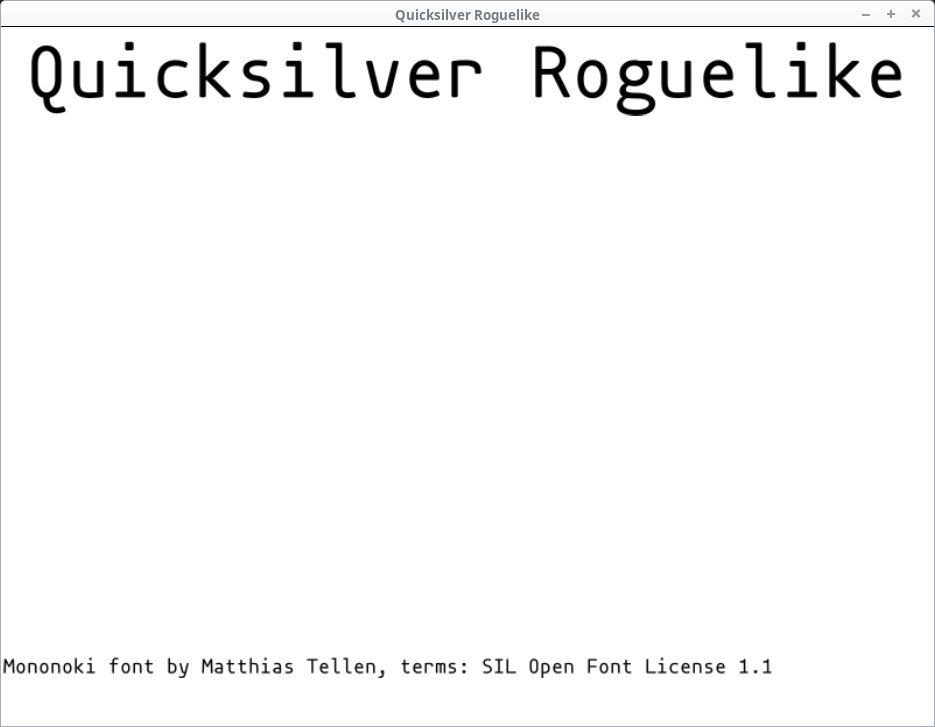
};Running the game should now produce an empty window filled with black:
$ cargo run --release
Assets
You may have noticed the following message when running the code:
Warning: no asset directory found. Please place all your assets inside
a directory called 'static' so they can be loaded
Execution continuing, but any asset-not-found errors are likely due to
the lack of a 'static' directory.
Quicksilver expects all the game assets to be in the static directory under the project’s root. We don’t have one, hence the warning.
Let’s create it:
$ mkdir staticOur repo should now look like this:
├── Cargo.lock
├── Cargo.toml
├── src
│   └── main.rs
├── static
└── target
    └── release
What goes into static? Sounds, images, models, maps and anything else your game will need to load. Including fonts.
Let’s use mononoki, a beautiful little monospace font. Go to the mononoki website and download it.
It is an open source font created by Matthias Tellen distributed under the Open Font License 1.1.
Unpack it and copy the mononoki-Regular.ttf file into our new static directory.
Loading the font
All initial asset loading should happen in the new function. We will load the font file, use it to render text into an image and store it in our Game struct:
fn new() -> Result<Self> {
    let font_mononoki = "mononoki-Regular.ttf";

    let title = Asset::new(Font::load(font_mononoki).and_then(|font| {
        font.render("Quicksilver Roguelike", &FontStyle::new(72.0, Color::BLACK))
    }));

    let mononoki_font_info = Asset::new(Font::load(font_mononoki).and_then(|font| {
        font.render(
            "Mononoki font by Matthias Tellen, terms: SIL Open Font License 1.1",
            &FontStyle::new(20.0, Color::BLACK),
        )
    }));

    Ok(Self)
}
We’re rendering two bits of text: a heading 72 points big and the font’s credits.
Thanks, Matthias!
Font::load returns a Future. It exits immediately and loads the actual file in the background. Calling and_then will let us manipulate the value (font) when it’s ready.
Quicksilver does dynamic asset loading for us!
Note that, “render” here doesn’t mean “draw onto the screen”. font.render takes a text and a style (font size & colour) and creates an image we can draw later.
Font rendering takes a lot computational of work. It has to rasterise the glyphs, handle kerning, etc. Drawing an image is much faster. So we do all the hard work once, store the results and then just draw a static image later.
To make both of our images (title and the credits) available to the draw method, we’ll store them in the Game struct:
struct Game {
    title: Asset<Image>,
    mononoki_font_info: Asset<Image>,
}
And return them from new:
Ok(Self {
    title,
    mononoki_font_info,
})
We also need to a few new imports from quicksilver:
use quicksilver::{
    geom::Vector,
    graphics::{Color, Font, FontStyle, Image},
    lifecycle::{run, Asset, Settings, State, Window},
    Future, Result,
};
(we’ve added the graphics section, lifecycle::Asset and Future).
Drawing text
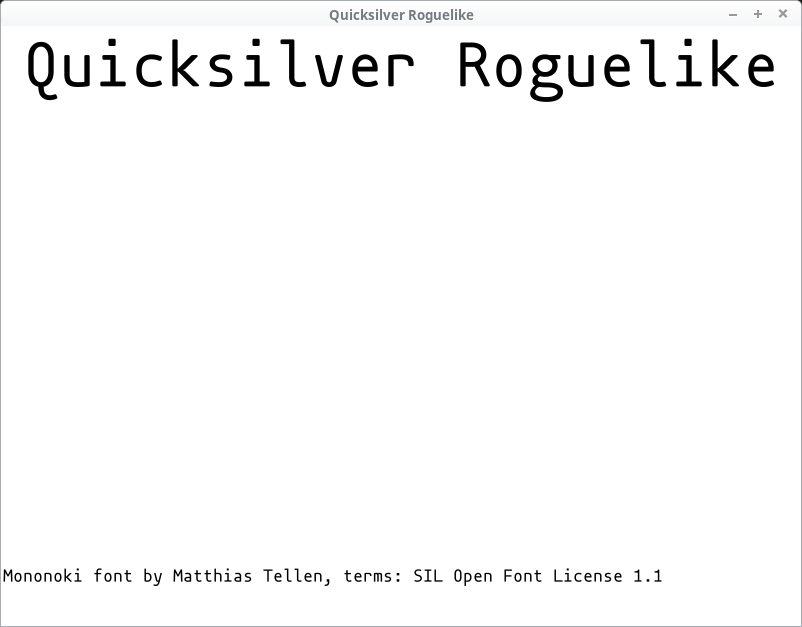
We wrote a bunch of code, but if we run the game, nothing changed. We need to draw the text on screen which happens in the draw function.
Since we rendered our text black, we’re going to set the window’s background to white to make it visible. Let’s do that and draw the text:
fn draw(&mut self, window: &mut Window) -> Result<()> {
    window.clear(Color::WHITE)?;

    self.title.execute(|image| {
        window.draw(
            &image
                .area()
                .with_center((window.screen_size().x as i32 / 2, 40)),
            Img(&image),
        );
        Ok(())
    })?;

    self.mononoki_font_info.execute(|image| {
        window.draw(
            &image
                .area()
                .translate((2, window.screen_size().y as i32 - 60)),
            Img(&image),
        );
        Ok(())
    })?;

    Ok(())
}
window.clear(color) is quite straightforward, but what’s the deal with this execute stuff?
We’re not storing the images directly – we’re storing them in an Asset<Image>. An Asset wraps a Future that is, a value that might not actually exist yet (because the font did not finish loading).
To get to the Asset’s inner value, we need to call execute and pass in a closure that operates on that asset (an Image in our case). If it’s loaded, the closure will be called, if not, nothing will happen (but the program will keep going).
There’s also a
Asset::execute_orwhich can call a function if the loading did not complete yet.
Inside the closure we call window.draw which takes two parameters: a Drawable (an object that can be drawn: a Rectangle in our case) and a background.
There’s also window.draw_ex with more options such as transformation to apply or
zlayer (what’s on top of what).
The background can be an image (Background::Img), colour fill (Background::Col) or a combination of the two (Background::Blended).
We’re drawing images so we use Img(&image).
This might seem backward: we’ve got an image, so why do we draw a rectangle and set the image as the background? That’s how OpenGL and similar APIs work: you draw shapes and you either fill them with colour or a texture (our image).
We’re calling Image::area() to get the Rectangle (position and size). It’s positioned in the top-left corner however (x: 0, y: 0).
So we use .with_center to draw the title centered near the top of the screen and .translate to draw the message at the bottom.
“translate” is a fancy geometry word for moving stuff around. It adds the
xs andys together.
Let’s add the missing imports and see the result:
use quicksilver::{
    geom::{Shape, Vector},
    graphics::{Background::Img, Color, Font, FontStyle, Image},
    lifecycle::{run, Asset, Settings, State, Window},
    Future, Result,
};
We’ve added the geom::Shape trait for the with_center and translate methods as well as graphics::Background::Img.
Let’s run it:
$ cargo run --release
ugh
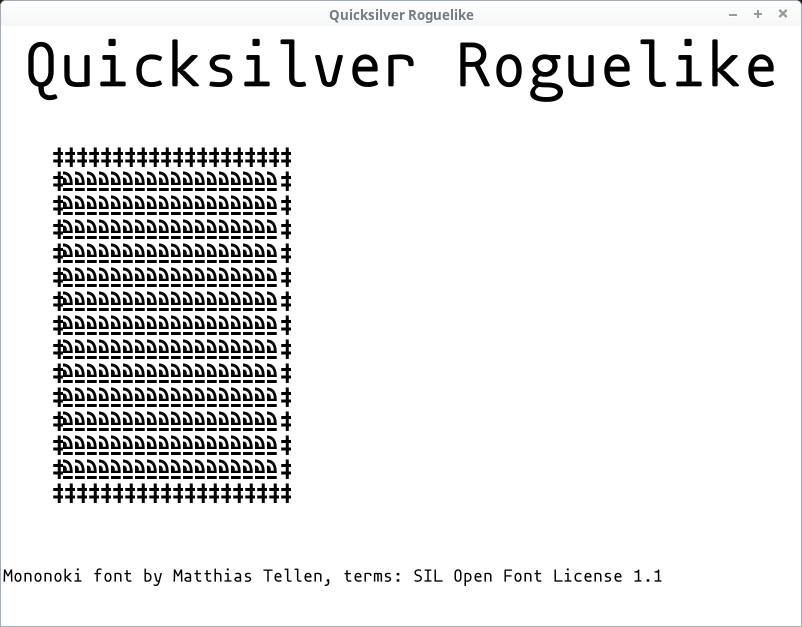
Depending on your system’s DPI settings, the text may either look fine or be the pixelated mess we see in the picture above.
Font rendering artefacts
If you see the artefacts (bear in mind that even if you don’t, your users might so we should handle this), they’re caused by a combination of two things:
- Window scaling due to DPI
- Quicksilver’s default image scaling strategy (pixelate)
You can read more about DPI here:
https://docs.rs/glutin/0.19.0/glutin/dpi/index.html
If your system is configured for a DPI that’s 1.3, the window size (with all its contents) will be scaled up to it. This is a very important accessibility feature and not handling it properly can make your program too small for people with bad eyesight or a “Retina display”.
The problem here isn’t the DPI itself, but how the image gets stretched.
By default, Quicksilver uses the Pixelate scale strategy which tries to preserve the individual pixels. This looks great at 2x, 3x etc. scales, but not so much at a 1.3x. Especially for text rendering.
We can switch to the Blur strategy instead. In main:
let settings = Settings {
    scale: quicksilver::graphics::ImageScaleStrategy::Blur,
    ..Default::default()
};
And now it looks blurry instead:
Not perfect, but it’s easier on the eyes.
If you want to have a full control over your the window and text size, add this line at the beginning of your main function:
std::env::set_var("WINIT_HIDPI_FACTOR", "1.0");That will force the DPI to be 1.0. Games are more sensitive to scaling than other application due to their pixel-based visual nature, so this can be OK. However you ought to provide a way of scaling the UI from within your game in that case! Ideally, defaulting to the system’s DPI value.
We will still keep the
Blurscaling strategy. Quicksilver’s coordinates are floating point numbers and things likewith_centercan easily result in non-integer values. Again, these tend to look better withBlur.
Generating the game map
Time to draw the actual game. We need a map and later on, the player, some items and NPCs.
Tiles
The map consists of tiles that look like this:
#[derive(Clone, Debug, PartialEq)]
struct Tile {
    pos: Vector,
    glyph: char,
    color: Color,
}
The pos is a quicksilver::geom::Vector. Your typical two-dimensional struct with x & y fields.
You might consider defining your own types for position, size, etc.
Vectorusesf32(you may prefer integers) and if you overload its meaning (e.g. using it for pixel as well as map tile coordinates), you can end up mixing them by accident.
A proper roguelike would use a procedural / random generation to build the map. We’re just going to create an empty rectangle with # as the edges:
fn generate_map(size: Vector) -> Vec<Tile> {
    let width = size.x as usize;
    let height = size.y as usize;
    let mut map = Vec::with_capacity(width * height);
    for x in 0..width {
        for y in 0..height {
            let mut tile = Tile {
                pos: Vector::new(x as f32, y as f32),
                glyph: '.',
                color: Color::BLACK,
            };

            if x == 0 || x == width - 1 || y == 0 || y == height - 1 {
                tile.glyph = '#';
            };
            map.push(tile);
        }
    }
    map
}
We create a new Vec (Rust’s growable array type – not Quicksilver’s Vector) and make it can hold all the tiles without reallocating.
If you know the size of a
Vecin advance, call with_capacity instead ofnew. Pushing elements to it will be faster because it won’t have to reallocate.
And then we create all the Tiles. The ones at the edge will be #, the rest is a ..
Entities
While the map is the static environment (walls, water, floor, etc.), entities are the interactive portions such as the player, items and NPCs.
The struct will have all the fields an entity might need:
#[derive(Clone, Debug, PartialEq)]
struct Entity {
    pos: Vector,
    glyph: char,
    color: Color,
    hp: i32,
    max_hp: i32,
}
Yep this meens food and doors would have hit points. That’s not as weird as it might seem (think of fire destroying everything by lowering HP – that can apply to any entity not just living things). If you’ve got zillions entities however, storing every field for every entity may be inefficient. Check out the entity-component-system pattern for an alternative.
Our generate_entities just returns a hardcoded list:
fn generate_entities() -> Vec<Entity> {
    vec![
        Entity {
            pos: Vector::new(9, 6),
            glyph: 'g',
            color: Color::RED,
            hp: 1,
            max_hp: 1,
        },
        Entity {
            pos: Vector::new(2, 4),
            glyph: 'g',
            color: Color::RED,
            hp: 1,
            max_hp: 1,
        },
        Entity {
            pos: Vector::new(7, 5),
            glyph: '%',
            color: Color::PURPLE,
            hp: 0,
            max_hp: 0,
        },
        Entity {
            pos: Vector::new(4, 8),
            glyph: '%',
            color: Color::PURPLE,
            hp: 0,
            max_hp: 0,
        },
    ]
}
Two Goblin NPCs and some food.
Let’s add the tiles and entities to our Game struct:
struct Game {
    title: Asset<Image>,
    mononoki_font_info: Asset<Image>,
    map_size: Vector,
    map: Vec<Tile>,
    entities: Vec<Entity>,
}
We’re adding the size of the map as well – that will come in handy later.
Next, call both functions in Game::new:
let map_size = Vector::new(20, 15);
let map = generate_map(map_size);
let mut entities = generate_entities();
And make sure we actually return the new fields:
Ok(Self {
    title,
    mononoki_font_info,
    map_size,
    map,
    entities,
})
We need to add the player (represented, as always, by the @ symbol), too!
Having all the entities (monsters, items, NPCs, player, etc.) in one place (the entities Vec) is quite useful, but the player character is always a little special. We often need to access it directly to show its health bar, update it’s position on key presses, etc.
So let’s also store the player’s index. That way we can look them up any time we want.
Put this in Game::new right after the generate_entities() call:
let player_id = entities.len();
entities.push(Entity {
    pos: Vector::new(5, 3),
    glyph: '@',
    color: Color::BLUE,
    hp: 3,
    max_hp: 5,
});
The player will have a blue colour and they will not be fully healed (so we can see write a nice two-colour health bar later).
Add player_id: usize to our Game definition:
struct Game {
    title: Asset<Image>,
    mononoki_font_info: Asset<Image>,
    map_size: Vector,
    map: Vec<Tile>,
    entities: Vec<Entity>,
    player_id: usize,
}
And return it at the end of new:
Ok(Self {
    ...
    player_id,
})
Building the tilemap
It’s time to draw the map on the screen. We want to produce a grid of letters that’s potentially changing every frame (as the characters move on the screen).
To do this we’re going to build a spritesheet (also known as tileset or texture atlas). It is a single image that will contain all of our graphics. The graphical ones look something like this:

Author: Daniel Schwen, license: CC SA 4.0
Ours is going to be built of letters not pictures, but the principle is the same. And if you want, you can replace it with actual graphics later.
This is one of the reasons we’ll build an atlas rather than calling
Font::renderfor each character or line on the map. We’d have to do it for images and this lets us swap them out (or support both) later. Plus it’s more efficient.
Games usually build these atlases during development and then only ship the composite image. You only need to do it once, after all.
We’re going to be a bit lazy and wasteful here, but you can (and probably should) do that in your build script instead.
One reason we do it in
main.rsis that all our code is in one place. That makes this tutorial easier to follow. Not recommended for a bigger project.
First, we will list all the characters we’re going to render. Put this in Game::new after our entity code:
let game_glyphs = "#@g.%";These are the characters we’re going to use. A bigger game will have more of these and you may want to generate them from your map and entities instead of hardcoding them like we do.
Then we let Quicksilver do its thing and render it into an Image just like before.
Drawing a part of an image is done via the subimage method. You give it a Rectangle and returns a new Image covering that portion and nothing else.
This will not clone the image’s contents.
Imagecontains a reference-counted pointer back to the source, so the operation is quick and doesn’t take up a lot of memory.
We could either call subimage directly in our draw function, or we could generate a sub-image once for each glyph and then just reference those when drawing. We’re going to do the latter and use a HashMap to get from a char to the corresponding Image.
There’s a ton of other ways to do this. For example: create an image of all ASCII characters and then have all the subimages in a
Vec<Image>. Each image’s index would be its ASCII value. This would probably be faster, but it could waste a little more memory and you’ll need to check that yourchar(a 32-bit Unicode value) can be converted to the right range. Also, what if you want to add some good-looking Chinese glyphs? You should measure and decide on trade-offs that suit your game.
We need to record the size of each tile (so we can pick it out of the tileset). Our font is twice as tall as it is wide, so 24x12 pixels should do nicely:
let tile_size_px = Vector::new(12, 24);And build the tileset:
let tileset = Asset::new(Font::load(font_mononoki).and_then(move |text| {
    let tiles = text
        .render(game_glyphs, &FontStyle::new(tile_size_px.y, Color::WHITE))
        .expect("Could not render the font tileset.");
    let mut tileset = HashMap::new();
    for (index, glyph) in game_glyphs.chars().enumerate() {
        let pos = (index as i32 * tile_size_px.x as i32, 0);
        let tile = tiles.subimage(Rectangle::new(pos, tile_size_px));
        tileset.insert(glyph, tile);
    }
    Ok(tileset)
}));
The beginning is the same as our other font-rendering: we load the font and build the image.
The rest creates a new HashMap and then creates a new sub-image for every glyph.
This relies on the fact that every glyph has the same width. In other words, it only works for monospace fonts such as ononoki. If you want to use a proportional font (say Helvetica), you will need to build the font-map yourself. You can use the
rusttypelibrary to do it.
Add the tileset and tile_size_px to the Game struct:
struct Game {
    title: Asset<Image>,
    mononoki_font_info: Asset<Image>,
    map_size: Vector,
    map: Vec<Tile>,
    entities: Vec<Entity>,
    player_id: usize,
    tileset: Asset<HashMap<char, Image>>,
    tile_size_px: Vector,
}
and return them from new:
Ok(Self {
    ...
    tileset,
    tile_size_px,
})
We need to add quicksilver::geom::Rectangle and std::collections::HashMap to our imports:
use quicksilver::{
    geom::{Rectangle, Shape, Vector},
    graphics::{Background::Img, Color, Font, FontStyle, Image},
    lifecycle::{run, Asset, Settings, State, Window},
    Future, Result,
};

use std::collections::HashMap;
Drawing the map
We’ve got the map and the tiles, so we can finally put them to use!
Drawing the map is easy: we calculate the position of each tile, grab the corresponding image and draw it on the window. Since tileset is an Asset, this must happen inside an execute block:
fn draw(&mut self, window: &mut Window) -> Result<()> {
    // ...

    let tile_size_px = self.tile_size_px;

    let (tileset, map) = (&mut self.tileset, &self.map);
    tileset.execute(|tileset| {
        for tile in map.iter() {
            if let Some(image) = tileset.get(&tile.glyph) {
                let pos_px = tile.pos.times(tile_size_px);
                window.draw(
                    &Rectangle::new(pos_px, image.area().size()),
                    Blended(&image, tile.color),
                );
            }
        }
        Ok(())
    })?;

    Ok(())
}
If we called self.tileset.excute without the let lines above it, it would mutably borrow the entire Game struct and we wouldn’t be able to access self.map or self.tile_size_px. So we do a partial borrow and call execute on that.
Try removing the
letlines and useself.mapetc. in thedrawfunction. See what happens!
The Vector::times method multiplies the corresponding Vector elements. So v1.times(v2) is the same as: Vector::new(v1.x * v2.x, v1.y * v2.y). This gets us from the tile position (from 0 to 20) to the pixel position on the screen (from 0 to 240).
There are a few different ways to multiply vectors in Maths (cross product, dot product, per-element), so they’re all available as separate methods with their own names instead the
v1 * v2operator you might expect.
And finally, the Blended background option allows us to apply a colour to the pixels on the picture. Since our glyphs are white, this turns them into whatever colour we set.
We need to add it to our use statement:
quicksilver::graphics::Background::BlendedAnd that should do it:
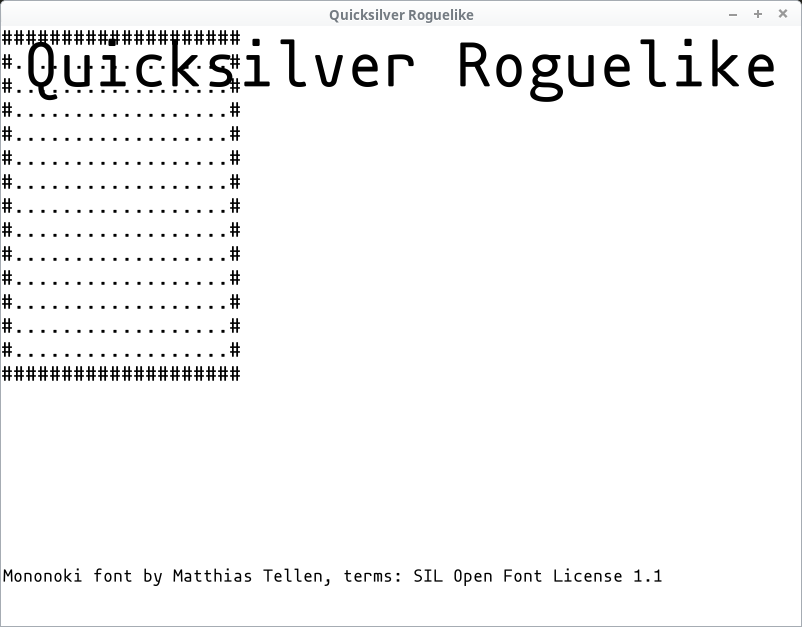
Looking good, but the map is in the top-left corner, obscured by the title text! Let’s fix that.
We’d like to move the whole map out of the title’s way. That means shifting each tile that we draw. Let’s say 50 pixels to the right and 120 down.
let offset_px = Vector::new(50, 120);And then in window.draw we’ll add offset_px to pos_px in the Rectangle::new call:
window.draw(
    &Rectangle::new(offset_px + pos_px, image.area().size()),
    Blended(&image, tile.color),
);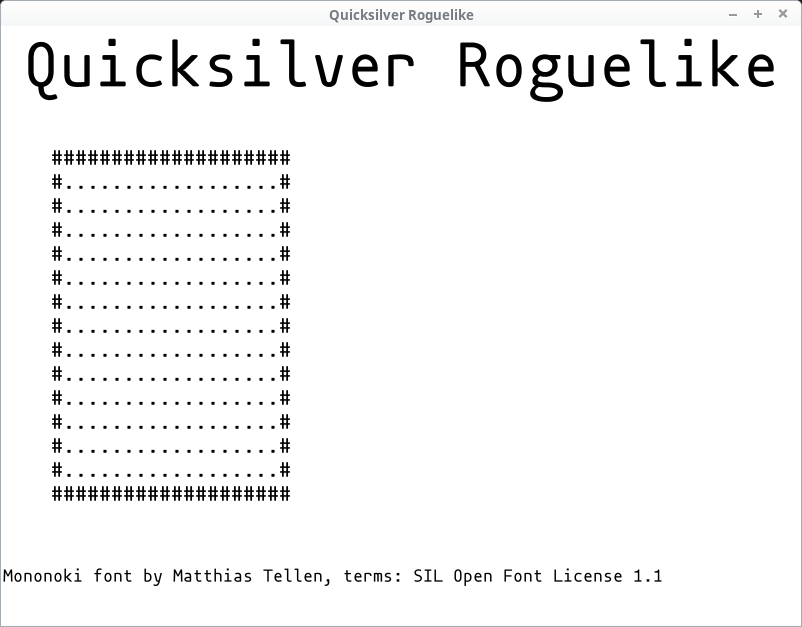
Better.
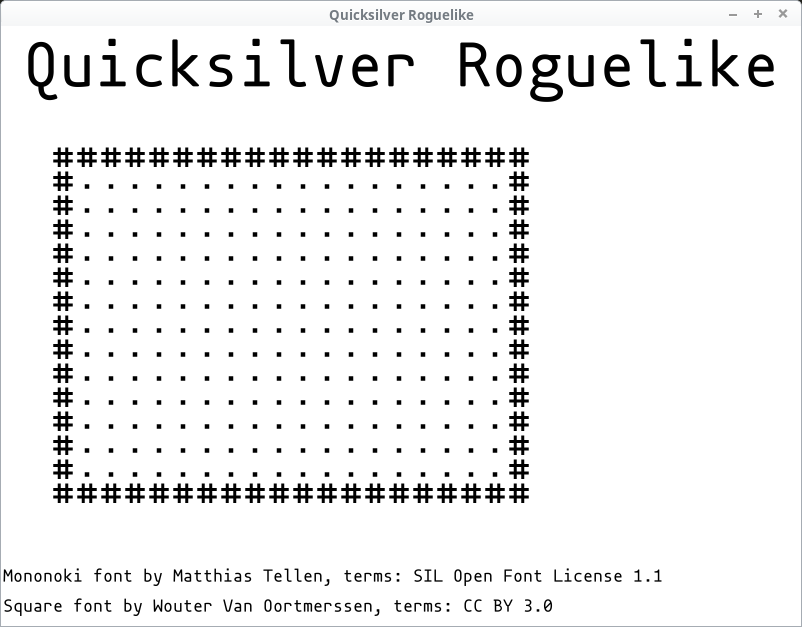
Adding a square font
This starts to look like a roguelike, but we can improve upon it. Why are the tiles not square? Personal preference aside (whatever floats your boat), in our case it’s just an artefact of the font we’re using.
We’ve picked mononoki, because we like it! It looks great, has visually distinct characters and even normal text looks decent in it (though when it comes to reading a block of actual text, nothing beats proportional fonts).
“we” == Tomas Sedovic. I like mononoki. It’s awesome. If you disagree, pick a different font!
But it’s not a square font.
If we were writing a terminal game or using a library that emulates one (such as libtcod), everything would be the same font and you’d have to choose between a square font (good for the map, bad for text) or a non-square one (good for text, bad for the map).
Neither is a great option, but all old-school roguelikes were that way.
We can do (arguably) better, however!
Let’s just pick a second font with square proportions and use that for the map (and keep doing text with mononoki).
For a font with square proportions, you clearly can’t do better than Square:
http://strlen.com/square/?s[]=font
It’s licensed under CC BY 3.0. Download it and put square.ttf in the static folder.
You can also just keep using a non-square font and simply center each glyph into a square tile. I did that in my first game. It’s fine.
We’ll need to tweak a few things in Game::new. We’ll add the new font file name and then replace font_mononoki in the tileset’s Font::load with font_square:
let font_square = "square.ttf";
let game_glyphs = "#@g.%";
let tile_size_px = Vector::new(12, 24);
let tileset = Asset::new(Font::load(font_mononoki).and_then(move |text| {
    let tiles = text
        .render(game_glyphs, &FontStyle::new(tile_size_px.y, Color::WHITE))
        .expect("Could not render the font tileset.");
    let mut tileset = HashMap::new();
    for (index, glyph) in game_glyphs.chars().enumerate() {
        let pos = (index as i32 * tile_size_px.x as i32, 0);
        let tile = tiles.subimage(Rectangle::new(pos, tile_size_px));
        tileset.insert(glyph, tile);
    }
    Ok(tileset)
}));
You might wonder whether we should also update tile_size_px. We should! Look what happens if we don’t:
Glitches like these are one of gamedev’s lesser-known pleasures.
Make the tile size a proper square:
let tile_size_px = Vector::new(24, 24);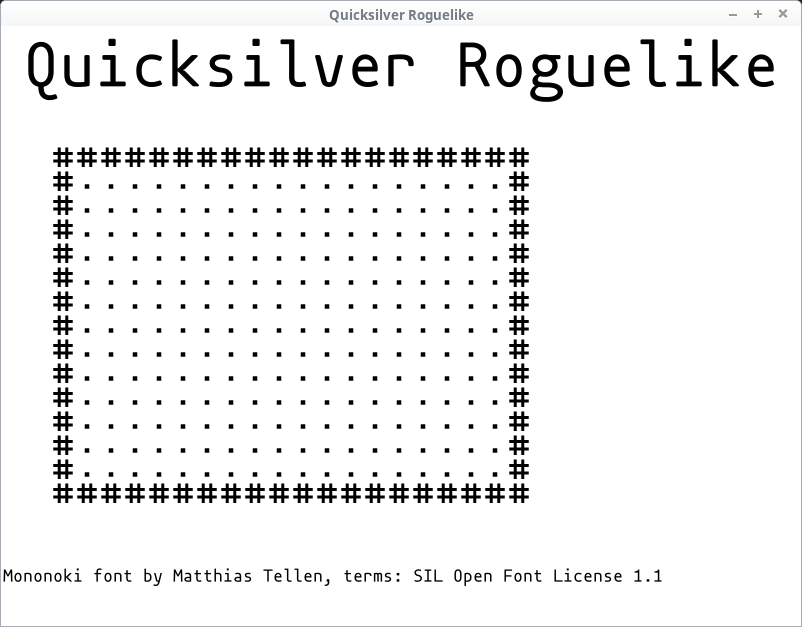
Take that, 1950s terminals!
Z3, one of the first computers with a textual terminal had 1408 bits of data memory. Our tileset image alone has 11,520 bytes.
Square credit
Since we’ve added another font, let’s show our appreciation to its author too!
In Game::new:
let square_font_info = Asset::new(Font::load(font_mononoki).and_then(move |font| {
    font.render(
        "Square font by Wouter Van Oortmerssen, terms: CC BY 3.0",
        &FontStyle::new(20.0, Color::BLACK),
    )
}));
Add it to the Game struct:
square_font_info: Asset<Image>,And then in Game::draw:
self.square_font_info.execute(|image| {
    window.draw(
        &image
            .area()
            .translate((2, window.screen_size().y as i32 - 30)),
        Img(&image),
    );
    Ok(())
})?;
Thanks a bunch, Wouter!
Drawing entities
Now that our map looks the way we want it, let’s add the entities. The code is pretty much identical to how we draw the map:
let (tileset, entities) = (&mut self.tileset, &self.entities);
tileset.execute(|tileset| {
    for entity in entities.iter() {
        if let Some(image) = tileset.get(&entity.glyph) {
            let pos_px = offset_px + entity.pos.times(tile_size_px);
            window.draw(
                &Rectangle::new(pos_px, image.area().size()),
                Blended(&image, entity.color),
            );
        }
    }
    Ok(())
})?;
It’s so similar that you might consider using the same structure for both and draw everything in one block. That’s perfectly feasible, give it a go!
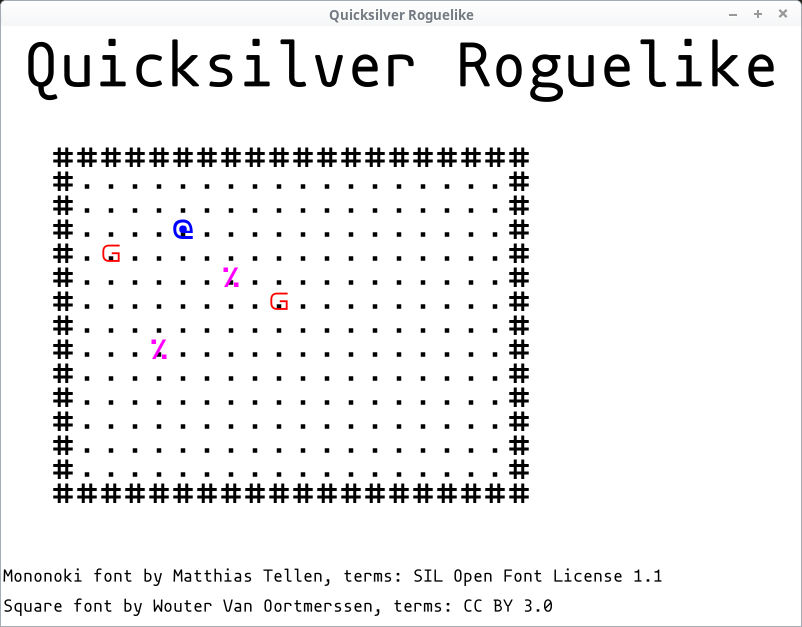
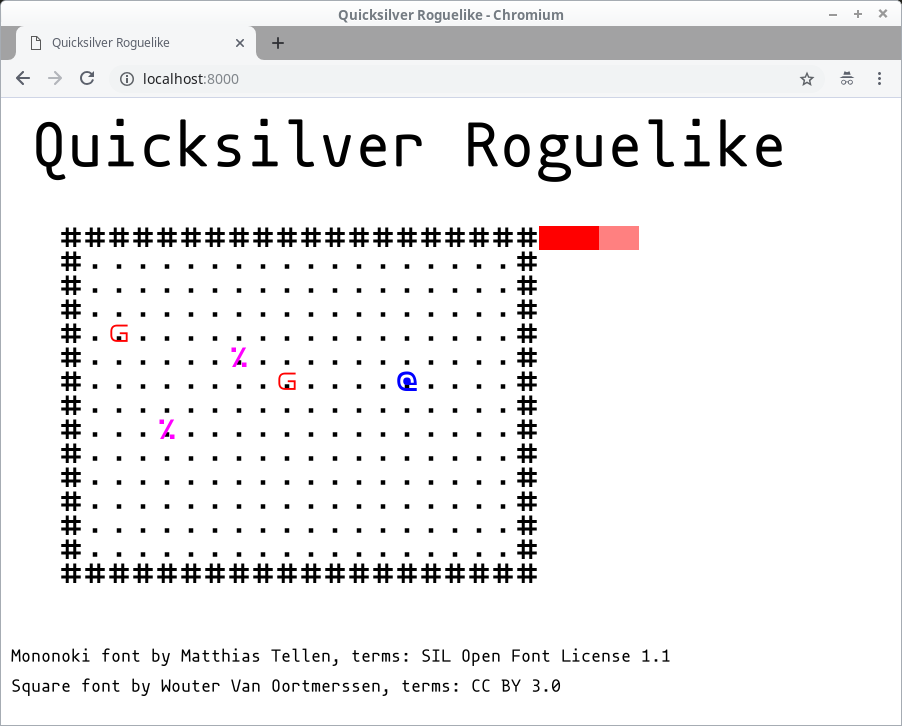
We can see the player (@) a couple of (definitely friendly) goblins (g) and some purple food (%). Time to party!
You may also notice that the dots representing empty space are still visible. The images are just drawn on top of one another so if they don’t cover something perfectly, it will peek through.
Spoiler alert: we will not fix that here. It’s your first homework!
Health bar
One final piece of distinguished visual art: our protagonist’s health bar!
We’re going to get the player’s entity, set the full bar’s width at a hundred pixels and calculate how much of it should we show based on the player’s hit points:
let player = &self.entities[self.player_id];
let full_health_width_px = 100.0;
let current_health_width_px =
    (player.hp as f32 / player.max_hp as f32) * full_health_width_px;
Next, let’s calculate its position. We’re going to place it at the right hand side of the map. That means getting the map’s size in pixels plus the offset:
let map_size_px = self.map_size.times(tile_size_px);
let health_bar_pos_px = offset_px + Vector::new(map_size_px.x, 0.0);
And finally draw it. First we draw the full width in a somewhat transparent colour and then the current value in full red:
// Full health
window.draw(
    &Rectangle::new(health_bar_pos_px, (full_health_width_px, tile_size_px.y)),
    Col(Color::RED.with_alpha(0.5)),
);

// Current health
window.draw(
    &Rectangle::new(health_bar_pos_px, (current_health_width_px, tile_size_px.y)),
    Col(Color::RED),
);
And we need to use quicksilver::graphics::Background::Col. That’s the final Background value – representing the whole area filled with the given colour.

Move the player around
Games have to be interactive. Let’s move our player if any of the arrow keys are pressed:
/// Process keyboard and mouse, update the game state
fn update(&mut self, window: &mut Window) -> Result<()> {
    use quicksilver::input::ButtonState::*;

    let player = &mut self.entities[self.player_id];
    if window.keyboard()[Key::Left] == Pressed {
        player.pos.x -= 1.0;
    }
    if window.keyboard()[Key::Right] == Pressed {
        player.pos.x += 1.0;
    }
    if window.keyboard()[Key::Up] == Pressed {
        player.pos.y -= 1.0;
    }
    if window.keyboard()[Key::Down] == Pressed {
        player.pos.y += 1.0;
    }
    Ok(())
}
Straightforward stuff.
Finally, if you want to quit the game, call window.close():
if window.keyboard()[Key::Escape].is_down() {
    window.close();
}
Please make sure you don’t ship your game with this left in! Someone will press
Escunintentionally and lose their progress (or at least be annoyed they have to restart the game). That someone will be me. Please add a confirmation step before closing the window.
We’ll need to add quicksilver::input::Key to our use declarations.
As you can see, the player can walk through everything. The goblins, food, even the walls! This is fine if you’re making a roguelike where you’re a ghost, but probably not in most other circumstances.
We’re not going to fix that here either! Your second homework.
Web Version
One last thing.
Running the game with cargo run builds the desktop version. But we promised that Quicksilver can do a web version too.
Run:
$ cargo web start --release --auto-reloadand go to:
It works! And it looks just like the desktop version. No changes necessary.
If you run this:
$ cargo web deploy --releaseEverything will be added to your target/deploy directory. Upload it on the web, give people the link and they can play it right their in the browser – no need to install anything!
GitHub Pages
You can publish your game to GitHub Pages like so. Assuming your GitHub username is sam and your repo is called roguelike, you can do this:
$ cd ~/code/roguelike  # or whetever your code is
$ git checkout -b gh-pages
$ cargo web deploy --release
$ cp -r target/deploy/* .
$ git add .
$ git commit -m "Add wasm build"
$ git push -u origin gh-pages
And now go to: https://sam.github.io/roguelike/
(of course swapping your user and repo name for the right values)
My repo is at quicksilver-roguelike and I’m @tomassedovic on GitHub, so you can check out my build here:
https://tomassedovic.github.io/quicksilver-roguelike/
Make your own game
This is where we end, but you are just beginning!
We’ve built something that has a lovely square map, readable text, filled rectangles and runs on Windows, macOS, Linux and the freaking web!
But it’s not a real roguelike yet. In addition to the homework, it’s missing some of these things:
- procedural map generation
- collision handling
- monsters
- AI
- combat
- items
Plus whatever unique twists you want to do! Go make games!
More resources
Quicksilver tutorial:
https://docs.rs/quicksilver/0.3.5/quicksilver/tutorials/index.html
Quicksilver API docs:
https://docs.rs/quicksilver/0.3.5/quicksilver/index.html
Rust’s docs on std::collections:
https://doc.rust-lang.org/std/collections/index.html
You will be using collections in your games and this is an excellent overview of what’s in the standard library and when you might want to use it.
The 7 Day Roguelike Challenge (7DRL):
